This is actually very unlike a man page. It assumes that you know very little about
TCP/IP networking. It also deals with only the parameter-less
invocation of ifconfig, since other invocations are well documented
in the real man page.
You can read the sections independently of one another, skipping what
you already know. In this regard, it is quite like a man page.
What is ifconfig?
ifconfig is a systems administration utility for UNIX-like systems
that allows for diagnosing and configuring network
interfaces. Although some claim that it is being replaced with iproute2 (or simply the ip command), I
have seen it being used abundantly.
You can using ifconfig to bring up interfaces, turn them off, and configure
the protocols and identifiers they use.
Why document it?
ifconfig prints out a wealth of information if invoked
without any parameters and options. I simply could not find the
definitions of most of these things and what follows
is my attempt at documenting these exhaustively.
This is what we see when we invoke GNU ifconfig on a virtual host running
Ubuntu. Note the absence of a wifi interface, as is the case with most
servers.
$ ifconfig
eth0      Link encap:Ethernet  HWaddr 08:00:27:0c:49:47
          inet addr:192.168.0.121  Bcast:192.168.0.255  Mask:255.255.255.0
          inet6 addr: fe80::a00:27ff:fe0c:4947/64 Scope:Link
          UP BROADCAST RUNNING MULTICAST  MTU:1500  Metric:1
          RX packets:3461 errors:0 dropped:0 overruns:0 frame:0
          TX packets:3686 errors:0 dropped:0 overruns:0 carrier:0
          collisions:0 txqueuelen:1000
          RX bytes:1778710 (1.7 MB)  TX bytes:821363 (821.3 KB)
          Interrupt:10 Base address:0xd020

lo        Link encap:Local Loopback
          inet addr:127.0.0.1  Mask:255.0.0.0
          inet6 addr: ::1/128 Scope:Host
          UP LOOPBACK RUNNING  MTU:16436  Metric:1
          RX packets:12 errors:0 dropped:0 overruns:0 frame:0
          TX packets:12 errors:0 dropped:0 overruns:0 carrier:0
          collisions:0 txqueuelen:0
          RX bytes:720 (720.0 B)  TX bytes:720 (720.0 B)
The Ethernet Interface
eth0 Link encap:Ethernet HWaddr 08:00:27:0c:49:47
Application data is progressively encapsulated as it descends through
the layers of the TCP/IP Stack. Link encap:Ethernet means that IP
Datagrams coming from the Internet layer will be wrapped in an Ethernet
Frame before leaving this interface.
HWaddr 08:00:27:0c:49:47 is the 48 bit Media Access Control (MAC) address. It uniquely
identifies this network interface on the hardware layer. This address
will be sent in ARP (Address Resolution Protocol) reponse packets when other devices want to send
Ethernet Frames to this interface.
The IPv4 address
eth0 inet addr:192.168.0.121 Bcast:192.168.0.255 Mask:255.255.255.0
inet addr:192.168.0.121 needs no introduction, it is the 32 bit IPv4 address that
this interface is using. Wanting to know this address is also probably the most common reason
for invoking ifconfig.
Modern networking relies on slicing networks
into smaller portions using subnetting and Classless
Inter-Domain Routing (CIDR).
For subnetting to work, we need to understand what part of
an IP address is the Network ID and what part is the Host ID. This
information is carried in the Network Mask Mask:255.255.255.0.
Bcast:192.168.0.255 is the broadcast address of the subnetwork the interface is
on. Packets sent to this address will be received by all interfaces
on this subnet.
We get this the broadcast address by masking the IP Address with a
bit complement of the network mask Mask:255.255.255.0 like this –
Network Mask:           255 . 255 . 255 .   0

Complement all bits:      0 .   0 .   0 . 255
Original IP address:    192 . 168 .   0 . 121
                        _____________________
OR them bitwise:        192 . 168 .   0 . 255
                        Which is the Broadcast Address
Next, let’s go over the IPv6 address
I never paid much attention to IPv6 addresses in the past. However, it
isn’t too complicated to get to the bottom of it. Your local IPv6
addresses are essentially based on the MAC address of the interface.
eth0 inet6 addr: fe80::a00:27ff:fe0c:4947/64 Scope:Link
fe80::a00:27ff:fe0c:4947/64 is the 128 bit link-local IPv6 address
for the interface. We understand that it is a link-local address
because of the Scope:Link field. Link-local IPv6 addresses are for
communicating with the directly attached network, and not globally.
This is how all link-local addresses are laid out:

10 bytes     | 54 bytes   | 64 bytes
1111 1110 10 | All Zeroes | Interface Identifier

Let's see whether our IPv6 address conforms to this pattern:

                fe80::a00:27ff:fe0c:4947

  (we replace :: with multiple all-zero double-octets)

      fe80:0000:0000:0000 : 0a00:27ff:fe0c:4947

           PREFIX         |   INTERFACE IDENTIFER
  All these zeroes make a | This looks a lot similiar
  link-local IPv6 address | to the MAC address which
  non-routable            | is '08:00:27:0c:49:47'
The Interface Identifier is in fact usually made up using the MAC
address. This is called EUI-64, or Extended Unique Indentifier by the IEEE.
  08:00:27:0c:49:47        # Start with the MAC adress

  08:00:27:ff:fe:0c:49:47  # Insert ff:fe in the center
  0a:00:27:ff:fe:0c:49:47  # Invert the 7th MSB starting from the right

  0a00:27ff:fe0c:4947      # Group it into double octets!
More about the interface
eth0 UP BROADCAST RUNNING MULTICAST MTU:1500 Metric:1
UP means that network interface is activated (with address and routing
tables) and is accessible to the IP layer.
BROADCAST means that interface supports broadcasting (and can hence obtain
an IP address using DHCP).
RUNNING signifies that the network driver has been loaded and has
initialized the interface.
MULTICAST tells us that multicasting support is enabled on this
interface.
Since we didn’t invoke ifconfig with the --all flag, it will only
print out interfaces that are currently UP.
MTU 1500 shows that the current Maximum Transmission Unit is set to 1500 bytes, the largest
allowed over Ethernet. Any IP datagrams larger than 1500 bytes will be
fragmented into multiple Ethernet Frames, if allowed by the routers
and hosts in between. Else we’ll just get an ICMP Destination
Unreachable response with Code 4.
And finally, Metric:1 is the cost associated with routing frames
over this interface. Normally, Linux kernels don’t build routing
tables based on metrics. This value is only present for
compatibility. If you do try to change the metric, it may not work. [1]
$ sudo ifconfig eth0 metric 2
SIOCSIFMETRIC: Operation not supported
Statistics
eth0      RX packets:3461 errors:0 dropped:0 overruns:0 frame:0
          TX packets:3686 errors:0 dropped:0 overruns:0 carrier:0
          collisions:0 txqueuelen:1000
          RX bytes:1778710 (1.7 MB)  TX bytes:821363 (821.3 KB)
RX stands for received and TX stands for transmitted.
Documentation for the fields that follow is sparse and only
long-deserted ghost-town forums popped up in my searches.
I download the source code for GNU inetutils 1.9.1
and here are my findings after a few recursive greps:
RX packets: total number of packets received.
RX errors: an aggregation of the total number of packets received
with errors. This includes too-long-frames errors, ring-buffer overflow errors, crc errors,
frame alignment errors, fifo overruns, and missed packets.
The ring-buffer refers to a buffer that the NIC transfers frames to before raising an IRQ with the
kernel.
The RX overruns field displays fifo overruns, which are
caused by the rate at which the ring-buffer is drained being higher
that the kernel being able to handle IO.
RX frame accounts for the incoming frames that were misaligned.
TX packets indicate the total number of transmitted packets.
TX errors present a summation of errors encountered while
transmitting packets. This list includes errors due to the
transmission being aborted, errors due to the carrier, fifo errors,
heartbeat errors, and window errors. This particular struct in the source code
isn’t commented.
We also have itemized error counts for dropped, overruns, and
carrier.
collisions is the number of transmissions terminated due to CSMA/CD
(Carrier Sense Multiple Access with Collision Detection).
The final line is merely all successfully received and
transmitted data in bytes and a human readable format.
Transmit Queue Length
Since this isn’t a statistic, it gets its own heading.
The txqueuelen field displays the current Transmit
Queue Length.
This queue limits the number of frames in the interface’s device driver that are queued for
transmission.
The value of the txqueuelen can also be set by the ifconfig command.
Interrupts
eth0 Interrupt:10 Base address:0xd020
Interrupt:10 corresponds to the IRQ number against which to look up
the eth0 device in /proc/interrupts, where the interrupts are counted.
$ cat /proc/interrupts
               CPU0
      0:        115    XT-PIC-XT-PIC    timer
      1:       3402    XT-PIC-XT-PIC    i8042
      2:          0    XT-PIC-XT-PIC    cascade
      5:          1    XT-PIC-XT-PIC    snd_intel8x0
      8:          0    XT-PIC-XT-PIC    rtc0
      9:          0    XT-PIC-XT-PIC    acpi
=>   10:      53981    XT-PIC-XT-PIC    eth0             <=
     11:       1535    XT-PIC-XT-PIC    ohci_hcd:usb1
     12:        146    XT-PIC-XT-PIC    i8042
     14:      16923    XT-PIC-XT-PIC    ata_piix
     15:      10416    XT-PIC-XT-PIC    ata_piix
53981 is the number of times the eth0 device has interrupted CPU0.
The third column tells the name of the programmable interrupt handler,
and XT-PIC-XT-PIC may be something that my VirtualBox is doing.
The Loopback Interface
lo        Link encap:Local Loopback
          inet addr:127.0.0.1  Mask:255.0.0.0
          inet6 addr: ::1/128 Scope:Host
          UP LOOPBACK RUNNING  MTU:16436  Metric:1
          RX packets:12 errors:0 dropped:0 overruns:0 frame:0
          TX packets:12 errors:0 dropped:0 overruns:0 carrier:0
          collisions:0 txqueuelen:0
          RX bytes:720 (720.0 B)  TX bytes:720 (720.0 B)
The Loopback is not an Ethernet device.
It isn’t connected to the NIC (or any hardware) and frames relayed over
the loopback don’t exit the host on any layer. It is fully implemented
in software. This also means that IP Datagrams sent over this
interface are not encapsulted in an Ethernet frame, as can be seen by
Link encap:Local Loopback.
IPv4 Addressing
lo inet addr:127.0.0.1 Mask:255.0.0.0
We have a large address space as set by the liberal subnet mask –
Mask:255.0.0.0.
The loopback device can be configured with an IP address on the 127.0.0.0/8 subnetwork which can be any address between 127.0.0.1 to
127.255.255.254. The loopback address on my machine is 127.0.0.1, which is usually the default.
And the IPv6
lo inet6 addr: ::1/128 Scope:Host
Unlike IPv4, only one address is reserved for the loopback interface in
the IPv6 address space – 0:0:0:0:0:0:0:1. It represented more
succintly as ::1/128 since we can replace consecutive groups of 0
by a ::.
The IPv6 Scope for the loopback address ::1/128 and is treated under the
link-local scope in RFC 3513. The terminology Scope:Host or
Scope:Node is also used to further emphasize that the packet will never exit the host
(or node). Unlike other link-local addresses, if a packet addressed
to ::1/128 is received on an Ethernet interface, it is promptly dropped.
The interface
lo UP LOOPBACK RUNNING MTU:16436 Metric:1
The eponymous LOOPBACK flag in the flags string isn’t as interesting
as the MTU:16436. Since the loopback interface isn’t bounded by the
physical limitations of Ethernet or FDDI, its MTU is set to more than
16KiB.
We can send a 16 x 1024 = 16384 byte data packet, with an additional
52 bytes without fragmenting it. 52 bytes are usually sufficient
for TCP and IP headers (both are 20 bytes long without options).
The concept of Metric is the same as it was for Ethernet interface above.
Statistics and Transmit Queue Length
lo        RX packets:12 errors:0 dropped:0 overruns:0 frame:0
          TX packets:12 errors:0 dropped:0 overruns:0 carrier:0
          collisions:0 txqueuelen:0
The fields for loopback statistics are printed out by the same
function and retain the same definitions from the Ethernet piece
above. However, errors and collisions have little chance of making an
appearance here, since there isn’t a physical medium present.
The txqueuelen is set to 0 by default. It can be changed for the
lo device, but I doubt if that would have any effect.
Other Tools
Don’t like GNU ifconfig or don’t have it? No problem, there are a few other ways of
querying a system for similar information. netstat -ai and ifconfig also work on Mac
OS X, but the output is slightly different since both tools originate
from the BSD userland.
With iproute2 –
$ ip --statistics link list
1: lo: <LOOPBACK,UP,LOWER_UP> mtu 16436 qdisc noqueue state UNKNOWN mode DEFAULT
    link/loopback 00:00:00:00:00:00 brd 00:00:00:00:00:00
    RX: bytes  packets  errors  dropped overrun mcast
    67710      812      0       0       0       0
    TX: bytes  packets  errors  dropped carrier collsns
    67710      812      0       0       0       0
2: eth0: <BROADCAST,MULTICAST,UP,LOWER_UP> mtu 1500 qdisc pfifo_fast state UNKNOWN mode DEFAULT qlen 1000
    link/ether 08:00:27:89:cf:84 brd ff:ff:ff:ff:ff:ff
    RX: bytes  packets  errors  dropped overrun mcast
    10372230   53359    9       0       0       0
    TX: bytes  packets  errors  dropped carrier collsns
    206555     1826     0       0       0       0
Or with netstat, on which the ifconfig output is actually based on –
$ netstat --all --interfaces
Kernel Interface table
Iface       MTU Met   RX-OK RX-ERR RX-DRP RX-OVR    TX-OK TX-ERR TX-DRP TX-OVR Flg
eth0       1500 0     56092     10      0 0          3095      0 0      0      BMRU
lo        16436 0       858      0      0 0           858      0 0      0      LRU
The Flg field above shows us the status of the interfaces. BMRU
stands for Broadcast, Multicast, Running, and Up. LRU stands for
Loopback, Running, and Up.
References
- Cotton, M., & Vegoda, L. (2010). Special Use IPv4 Addresses. Internet Engineering Taskforce RFC 5735.
- Domingo, D. & Bailey, L. (Eds.). (2011). Red Hat Enterprise Linux 6
Performance Tuning Guide. Red Hat, Incorporated.
- Fall, K. R., & Stevens, W. R. (2011). TCP/IP Illustrated, Volume 1:
The Protocols (Vol. 1). Addison-Wesley Professional.
- Hinden, R. M., & Deering, S. E. (2003). Internet protocol version 6
(IPv6) addressing architecture. Internet Engineering Taskforce RFC 3513.
- Hunt, C. (2002). TCP/IP network administration. O’Reilly Media,
Incorporated.
- Kempen, F., Cox, A., Blundell, P., Kleen, A., Eckenfels,
B. (2007). ifconfig(8) Manual Page.
- Kirch, O., & Dawson, T. (2000). Linux network administrator’s
guide. O’Reilly Media, Incorporated.
]]>
 You can differentiate between the client and server from the
source and destination port numbers. SSH servers usually work on port 22.
You can differentiate between the client and server from the
source and destination port numbers. SSH servers usually work on port 22.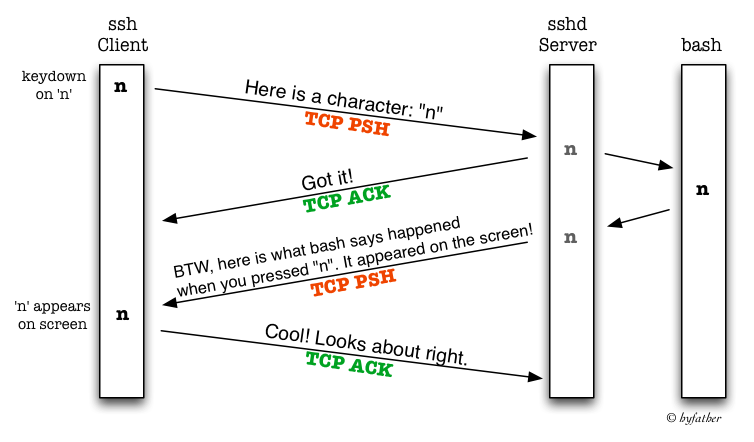
 Note that the server is sending the ACK to the character it received
and the response together in one TCP segment.
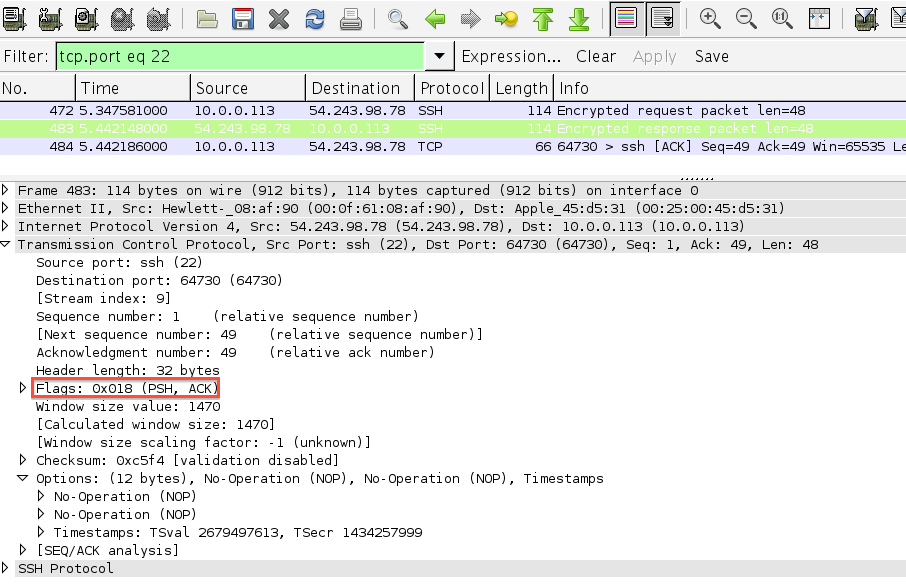
Note that the server is sending the ACK to the character it received
and the response together in one TCP segment. Note how the data in each segment plus the TCP and IP headers equal
the exact MTU of my Ethernet interface – 1500
Note how the data in each segment plus the TCP and IP headers equal
the exact MTU of my Ethernet interface – 1500